
#DONGLEGATE: A Guide To The Touch Bar MacBook Pro: Part 2 - All About Dongles

Like many, when I first heard the news that the entirety of the next generation MacBook Pro’s I/O would come in the form of four Thunderbolt 3/USB-C ports (and let’s not forget the critically endangered 1/8” headphone jack), I was skeptical and angry. Not only would I have to buy hundreds of dollars worth of adapters to continue using all of my existing accessories, I was already feeling somewhat limited by the Retina MacBook Pro’s two Thunderbolt 2, two USB 3.0, HDMI, and MagSafe ports. In anticipation of the 2016 release, I was hoping for an I/O expansion, not a reduction!
While I still believe that the MacBook pro really ought to have six Thunderbolt 3 ports in order to handle professionals’ I/O needs, I’ve actually learned to love the new flexibility that dongles offer. Sure, there are certain peripherals that now necessitate some messy multi-dongle setups, but in general, I’ve found that having ports capable of handling nearly every type of device opens up some new rigs that were not necessarily possible on the Retina MacBook Pros. For example, my most common location setup requires a minimum of 3 USB 3.0 A ports – two for hard drives and one for tethering. The Retina MacBook Pro required the use of a powered hub to achieve this, which was problematic when running off of a Versa Battery on location. Using dongles with the new Touch Bar MacBook Pro, it is possible to run three USB devices on location without the need for a hub. I can even add a monitor into the mix with Apple’s Multi-port AV Adapter which also gives me a USB-C power input and an additional USB-A port, all without the need for any hubs or power outlets.
While I’ve found that I tend to gravitate towards just a few specific dongles for most applications, my philosophy on set is the same as always: be prepared. Thus, I carry over a dozen different USB-C dongles in my kit. For instance, while I have mostly transitioned using HDMI for all of my displays, I still carry two DVI to USB-C dongles in my kit in case I need to connect to an existing system in the studio or an HDMI cable goes down - my monitor cable looms have a backup DVI cable in addition to the main HDMI cable just in case. It’s entirely possible that these dongles may never see use on set, but I carry them anyways on the chance that I find myself in a situation where I couldn’t live without them. Perhaps your work isn’t quite as “mission critical,” but it’s important to think about having a solid backup when you’re building out your dongle kit.
Love it or hate it, USB C is here to stay. If you’re thinking about upgrading to a Touch Bar MacBook Pro or purchased one recently and are struggling to adapt, read on to discover which dongles I’m using on set and why, as well as a few others that I’m not using.
USB A

Easily the most common computer connection out there, nearly every MacBook Pro user will want to have a couple USB-A adapters in their arsenal. I’m mostly using Apple’s USB-C to USB A adapters which, like all Apple accessories, cost a bit more than nearly everything else on the market. But when it comes to adapters, I’ve found that in general Apple’s own adapters offer the best build quality and performance and are worth the premium price. I also have a couple C to A adapters from Anker (no complaints so far) and a couple more from Rankie which are great if you prefer an adapter without an integrated cable. These ones fit side by side, unlike some of the other cableless dongles out there. For critical applications like camera tethering I always stick with the Apple adapters, but for less demanding devices, these cheaper alternatives work fine.
While many people seem to prefer multi-port one-size-fits-all dongles, I would still recommend carrying at least a couple dedicated USB-A dongles for your most critical devices. Most of the USB ports on the multi-port dongles I have used are less stable than the dedicated adapters.

HDMI
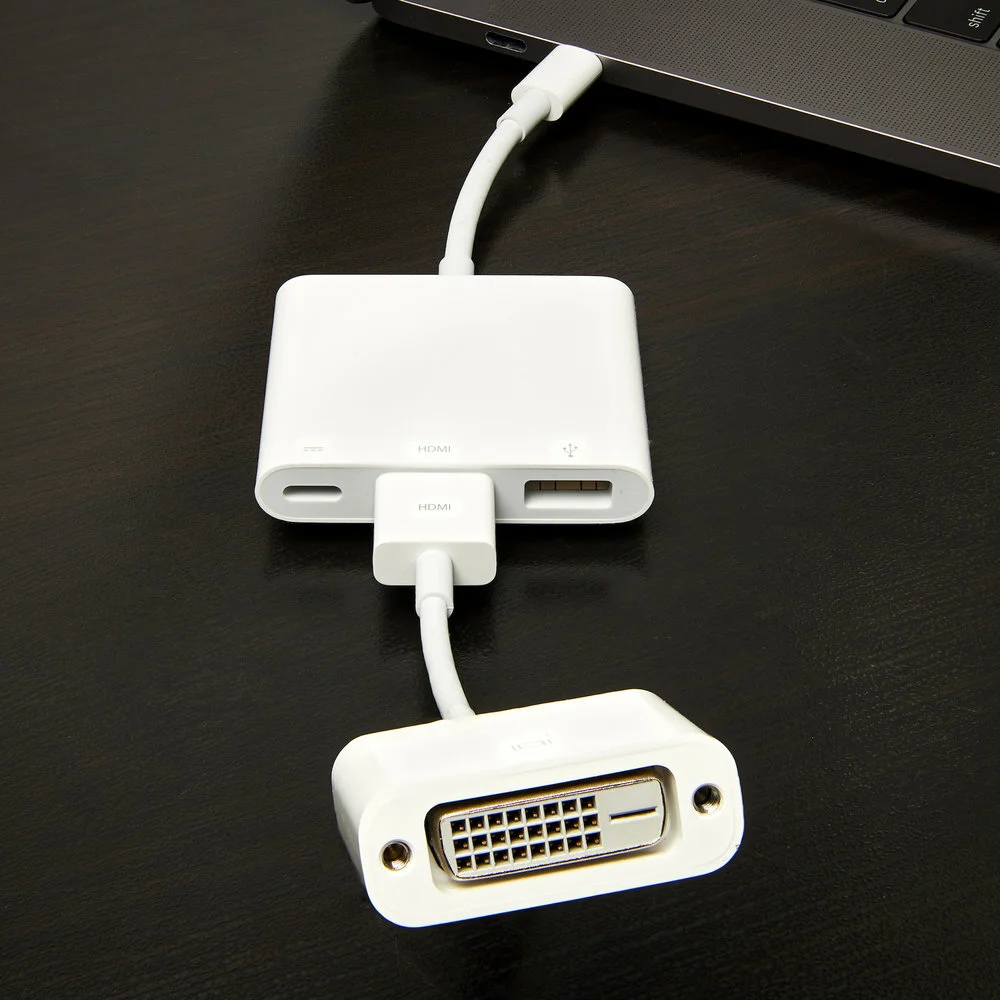
Before I transitioned over to the Touch Bar MacBook Pro, I mainly used DVI for long monitor cable runs and Mini DisplayPort to DisplayPort cables for anything under 10 feet. Unfortunately, the options are somewhat limited when it comes to adapting DVI and MiniDisplayPort to USB-C. I wanted to base my dongle setup around as many Apple OEM dongles as possible, so I decided to switch over to HDMI for most of my monitor connections so that I could use the Apple Multiport AV Adapter.
I like the Apple Multiport Adapter more than the other HDMI adapters I’ve tried for a couple reasons. First, it gives me an additional USB-A Port. Since I’m using Eizo monitors that require a USB connection in order to calibrate them properly, I like that I can run the entirety of my monitor’s I/O off of a single dongle rather than sacrificing an additional port for the USB. Secondly, the Multiport AV adapter gives me a USB-C Power port, again saving me a precious USB-C port for other devices. Like the auxiliary USB-C PD ports in many other dongles, this power port is only capable of handling 60W USB-C Power Delivery, but as I’ll detail in section four of this series, that isn’t too much of an issue in real world use.
I’ve also tried a few other dedicated USB-C to HDMI adapters from Anker, StarTech, and Kimwood. I found the Anker and StarTech models to perform just as well as the Apple Multiport AV dongle, but to my surprise the more generic Kimwood adapter actually outperformed them all. While testing a number of 50 foot HDMI cables, the Kimwood adapter was able to drive some of the underperforming cables with no issues, while the Apple, Anker, and Startech adapters (and even the OWC Thunderbolt 3 dock) were unable to deliver a signal. Again, I prefer the reliability and flexibility of the Mutliport AV Adapter to these one trick ponies, but if you’re looking to save a few dollars and can live without the additional ports, any of these options would be a good buy.
Thunderbolt 1 and 2

TB2AdapterSquare.jpg
If you need to continue using legacy Thunderbolt 1 and 2 devices with your new MacBook Pro, then Apple’s Thunderbolt 3 to 2 adapter is (nearly) your only option. Yes, other manufacturers like StarTech make Thunderbolt 3 to 2 adapters, but they are all within the same price range of the Apple adapter and are much bulkier. Definitely stick with Apple here.
It’s important to note that this adapter will only drive other Thunderbolt devices. It will not work with Mini DisplayPort devices or adapters (like the Apple Mini DisplayPort to DVI adapter). The adapter will work with other Thunderbolt adapters like the Thunderbolt to FireWire and Thunderbolt to Gigabit Ethernet adapters, but If you need to connect a Mini DisplayPort device like the 27” Apple Cinema Display, you’ll need a different adapter (see below).
Despite its limitations, there are a couple neat tricks to keep in mind that you can accomplish with this adapter. If you already have a Thunderbolt 2 dock, you can save a few hundred dollars and continue using it with your new MacBook Pro along with this adapter. I also use it to network with my older MacBook Pros via Thunderbolt 2. You can also use the adapter on the device side. For example, if you do plan on buying a Thunderbolt 3 dock or LG UltraFine 5K Display for your MacBook Pro (but seriously, don't buy that monitor), you can also use it with your 2013 Mac Pro at home by connecting the adapter to the device itself and then connecting a Thunderbolt 2 cable to your computer. Just keep in mind you’ll only be getting Thunderbolt 2 speeds out of these setups, but as long as you’re not trying to run an eGPU, that shouldn’t be much of an issue.

FireWire
Think about it… When was the last time you hooked up a FireWire device? I’ll wait… Unless you’re in a small category of users who regularly work with older Phase One P series or (*cringe*) Hasselblad digital backs, it’s probably been a minute. If you’re a long time Apple user and former FireWire devotee like me, it’s a little sad to watch FireWire 800 quickly go the way of SCSI and eSATA thanks to the proliferation of USB 3.0 and Thunderbolt. Nonetheless, you might occasionally find the need to hook up an old hard drive, audio interface, or digital back where FireWire is your only option.
When it comes to FireWire and Thunderbolt 3, there are really only two options. If you’re working with an older hard drive, audio interface, or other less demanding firewire device, your best option may be to stack the Apple Thunderbolt 3 to 2 and Thunderbolt to Firewire dongles. This should work fine for most consumer FireWire devices, and I’ve been told by a friend who works for a Hasselblad dealer that these dongles will also work just fine with an H5D setup. However, if you need to tether a Phase One back over FireWire (Pro Tip: There are very few situations where it is necessary to do this with IQ backs), you’ll want to step up to the OWC Thunderbolt Dock. Aside from the first generation Belkin Thunderbolt 1 Dock which is no longer on shelves, OWC is the only manufacturer that offers Thunderbolt docks with FireWire. Make sure you get the 13 port model. The newer less expensive 12 port model omits the firewire port. And again, If you already own an older Thunderbolt dock with Firewire, you can continue using it with your new MacBook Pro along with the Thunderbolt 3 to 2 adapter.
DisplayPort/Mini DisplayPort
While Apple offers no official way to adapt Mini Displayport devices to USB-C, there are a number of third party adapters available on Amazon that will get the job done. However, none of the adapters that I have tested allow you to “stack” your existing Mini DisplayPort dongles (DVI, HDMI, etc.). So unfortunately, your old dongles are now obsolete unless you spring for an OWC thunderbolt dock which has a Mini DisplayPort output that supports existing dongles. Another notable exception is Apple’s active Dual Link DVI to Mini DisplayPort adapter which works just fine as long as you power it with the USB cable. This is the combo you’ll need if you want to drive a display with a resolution greater than 1920x1200 over DVI.
DVI
Speaking of which, Apple’s official solution for connecting DVI devices with resolutions of 1920x1200 and under was originally to use their HDMI to DVI adapter in conjunction with the Multiport AV adapter (This combo should still work, but now Apple officially recommends using a third party DVI adapter). The piggyback solution is rock solid, but I find it to be incredibly cumbersome. I still carry those adapters as a backup, but I’ve bought a couple different Chinese DVI to USB-C adapters on Amazon as my primary solution (#1, #2). Both seem to be working great, though I have to admit that I’m not using DVI much at all with the new MacBook Pros. The one exception, to reiterate, are monitors such as the Apple 30” Cinema display that require a dual link DVI connection. Those will require doubling up the Apple Dual Link DVI Adapter with a suitable Mini Displayport to USB-C dongle.

USB C
This one might be a bit of a head scratcher. Why would you need to adapt USB-C to USB-C? Well, the answer is, again, the fact that the new MacBook Pros only have four ports. It's also a good idea to keep a couple C to A cables around so you can user newer devices with a Mac Pro or a client's older laptop. Hard drives are the best example here. While most mobile hard drives are now shipping with USB-C connections, I typically don’t have a free USB-C port to dedicate to each hard drive I’m using on set (at least two, sometimes as many as five). With ports dedicated to power, monitors, and the camera tether, sometimes I’m only left with one available port. In this situation, I need to use a four port USB hub, but since there don’t seem to be any four port USB-C hubs on the market right now, I’m forced to use a hub with USB-A ports. Therefore, I’m forced to use a C to A cable from the hard drives to the hub, which in turn is connected using a USB 3.0 B to C cable. In fact, this is one of many situations where a USB-C equipped device must be converted back to a USB-A connection before again being adapted to USB-C.
Another prime example is tethering a USB-C equipped camera like the Sony A7R III. While Tether Tools now makes USB-C tether cables for every type of connection, there still aren’t any active USB-C extension cables on the market that would allow me to extend a USB-C connection beyond 15 feet. Therefore, to tether a USB-C equipped camera I use a USB-C to USB-A cable into a USB-A female to USB-A Male 15 foot active extension which is in turn plugged into a USB-A to USB-C adapter. Now that’s a mouthful! While there will almost certainly be a day when USB-C can handle nearly every type of device end to end without reverting to older standards at some point in the chain, it seems as though it is still a few years away.
USB Hubs
Most of the USB-C to four port USB-A hubs on the market have two fatal flaws: integrated USB-C cables that are universally far too short for my application, and a lack of external power (some 4 port hubs also feature a USB-C PD port. I haven’t tested any of these hubs, but it appears that some of them do support the power needs of multiple HDDs. Nonetheless, they all still have integrated cables that are too short.) With my old laptop, I used a powered StarTech hub that worked great, but I had issues using it with the OEM cable and USB-C adapters, so about a year ago I tested a few of the only hubs that I could find that included a dedicated power supply. Unfortunately, none of them worked properly. My solution, which has been quite stable, was to buy a USB-C to USB-B cable that works with my existing StarTech hub. I even have a special USB to barrel adapter cable that allows me to power the hub off of my laptop battery setup (more on that in part 4). If you already have a USB hub that you really like, I would definitely recommend replacing the cable rather than the entire hub.


Another problem that I see with some of these newer hubs is that almost none of them offer any sort of USB-C port expansion aside from power delivery. Why are there no 4 port USB-C to USB-C hubs? Perhaps USB 3.1 cannot be daisy chained to the same degree as 3.0? If you have an answer let me know in the comments! So far, I’ve only found two hubs that give you extra USB-C ports for data: this one from IOGear (which also features 100W PD) and this one from Belkin (which doesn’t have USB-C Power Delivery, if you’re wondering why there are so many negative reviews from customers who didn’t read the item description close enough). If you can deal with the short integrated cable, I’d recommend giving that IOGear a try if you need additional USB-C ports!
Docks

In my opinion, thunderbolt docks really only make sense with a cart setup.
I get questions about thunderbolt docks in my inbox all the time. The truth is, since I very rarely need to use FireWire anymore, mine don’t see all that much use! I own both the OWC Thunderbolt 2 Dock and the OWC Thunderbolt 3 13 port Docks, and I initially bought both of them for use with my laptops. I thought they would be a fantastic addition to the Digiplate and give me all of the I/O I could possibly need. But it turns out that strapping a dock to an already heavy Digiplate adds a lot of unnecessary bulk. Furthermore, it requires AC power which can be problematic on location when there is no power available, or adds yet another messy cord to your setup when there is power. The final straw came when I realized after using the docks on a few jobs that I was only using them for their extra USB ports! I mean how often do you REALLY need ethernet, firewire, AND 1/8” audio in and out on location?
However, I do love using both docks when I’m using a cart setup. The Thunderbolt 2 dock now lives in my Mac Pro Rack Case and I use it to power a monitor and a number of USB devices. And I use the Thunderbolt 3 dock with the laptop on bigger jobs when I’m managing more client drives and monitors. And as I said before, if you need to run a high power FireWire device like a digital back, then the dock is an absolute necessity. But aside from that situation, I see it mostly as a great solution for someone who comes home from set and uses their laptop on their desk. And again, if you already have an older Thunderbolt dock, theres no real reason to buy a new one. Just get yourself a Thunderbolt 3 to 2 adapter!

A Couple Adapters I’ve Bought but Don’t Use
If you came here for a review of the ever popular Sanho HyperDrive USB-C hub, here it is: Don’t buy it! While this hub is noble in its aim to restore the I/O of the Retina MacBook Pro, unfortunately it doesn’t live up to expectations in the functionality department. I ordered this hub immediately when I bought my first Touch Bar MacBook Pro and used it on a few jobs before tossing it in a drawer. The USB-A ports simply don’t work well with high power devices like spinning hard drives, which tend to unmount fairly regularly with this adapter. And though I would never myself attempt to tether a camera through any type of multiport adapter short of an OWC hub, I’ve heard from other techs that this adapter doesn’t do a great job of sustaining a camera tether either. However, the HDMI and USB-C ports seem to work quite well, so if you want a compact swiss army knife type solution for travel, etc. this is probably your best bet. Just stick to one hard drive at a time or get yourself some Samsung T5 SSDs!
I also decided to pick up a massively overpriced StarTech multi display adapter that gives me DVI, VGA, HDMI, and Mini DisplayPort output in a sleek aluminum package. While this adapter works quite well, I quickly discovered that it is too bulky to use and the cable is too short for my to be able to mount it anywhere on my Digiplate. And unless you’re working on a desk, you won’t want this heavy dongle handing from your USB-C ports. You could buy all of these adapters individually for less money, and they would be more functional on their own, too. But at least I have a way to connect to VGA if the situation happens to arise for the first time in a decade! Be prepared!!!
Typical Dongle Combos
Now that you’ve heard all about which dongles I carry in my kit, let’s talk about how I actually combine them in various setups.

My most common dongle setup includes one Apple Multiport Digital AV Adapter, one USB-C to A adapter, and a 4 port USB-A hub with USB-C to B cable (no adapter).
For a basic location job where I’m not running any monitors, I’m typically just dealing with a camera and two hard drives. For this setup I could use three USB-C to A adapters to handle all of my I/O, but this configuration doesn’t leave any ports available if I need to connect a card reader or other accessory. Thus, I usually dedicate one USB-C port (with C to A adapter) to the camera tether and use my 4 port USB hub to handle the hard drives which leaves one USB-C port available for additional accessories. Whenever possible, I like to run power directly into the computer. While I could give myself an extra USB port by powering through a dongle like the Multiport Digital AV Adapter, most USB-C devices with Power Delivery only support 60W, so dedicating one of the computer's ports to the power supply is usually the only way to get 87W input for optimal performance with the 15" MacBook Pro.
One of my most common setups adds a satellite client monitor into this mix (pictured above). When I’m dealing with only one external monitor, I generally start with the setup described above and then I will run my monitor over HDMI via with a Multiport Digital AV adapter connected to the free port.
Though its rare, occasionally I need to drive two monitors from a tripod mounted laptop. In this case, I use an additional Multiport Digital AV adapter on the port I would normally dedicate to power and then connect the power supply to the USB-C PD port on the adapter. To recap: Ports one and two are driving Multiport Digital AV adapters and power is being supplied through one of them. Port three handles the camera tether, and port four is driving a 4 port USB hub for my hard drives and other accessories (don’t forget to use a powered hub!).
More often though, if I’m running two monitors off of a laptop, it means that I’m set up on my cart. In this situation, I bust out the OWC Thunderbolt 3 Dock. Aagain, though I find the dock to be unnecessary bulky for something I'm essentially using as a USB hub in most situations, being set up on a cart makes this less of an issue. The dock allows me to drive a monitor and up to 5 USB devices off of a single port, which means I regain the ability to run full 87W power directly into the MacBook Pro. In most cases, I’ll also run the camera tether off of the Thunderbolt dock since its ports reliably provide 900mA of current. So with one USB-C port, I can handle two to four hard drives, the camera tether, and one monitor. I can use a Multiport Digital AV adapter for my second monitor, and that setup still leaves me with one port available on the MacBook pro for another USB accessory or if necessary, a third monitor. Another common addition to this setup is a second MacBook Pro dedicated to image processing which I can network with a Thunderbolt cable to the available port (or the second Thunderbolt 3 port on the dock if all of the laptop's ports are in use).
Of course, sometimes situations come up that require a specialized dongle setup. This is especially true if I’m using someone else’s kit who may use different monitor connections, thunderbolt or firewire hard drives, a wired network, etc. and that is the main reason I carry additional dongles in my kit that I don’t regularly need. Since I’ve made some prudent changes to the rest of my kit (namely switching nearly all of my monitor cables over to HDMI), I’m able to get by in 99% of situations with just USB-C to A and Multiport Digital AV adapters plus a USB hub. If you’re looking for somewhere to start when building up your dongle arsenal, I would begin with at least two USB-C to A adapters and at least one Multiport Digital AV adapter.
Limitations of USB-C
Don't get me wrong, I think that Thunderbolt 3/USB-C is a really fantastic standard. Finally, one cable that does everything! That's really what we've all wanted deep down for eons, no?
For most types of devices, I think USB-C has the potential to be great - plenty of speed, easy and secure reversible connectors, and nearly infinite compatibility with older peripherals (for a price). Adapters are annoying, of course. I've already spent over $1000 on docks and adapters for my three Touch Bar MacBook Pros. But theoretically as time wears on adapters will become less and less necessary until every device we own will connect with USB-C (at which point of course the Capitalist pigs in Silicon Valley will be inclined to introduce a new standard, I'm sure).
The problem is, USB-C will likely never be the most practical solution for many of my needs on set. When it comes to running remote monitors, I don't see USB-C overtaking 25 foot+ HDMI or DVI cables in terms of price or reliability any time soon. At the moment, a USB-C male to C female extension cable long enough for camera tethering doesn't exist to my knowledge, and though we're starting to see some USB-C tether cables on the market, their reliability is questionable compared to USB A cables used with an adapter. This could certainly change in the future, but as we've seen with previous standards, it takes time to engineer new cables in longer lengths. And being somewhat niche products, there is less of a demand for them to become available, so I'm anticipating that I will continue to use USB-A to x and HDMI with adapters for my long cable runs for at least a couple more years.
Another current issue with USB-C is that most current accessories are attempting to give us our old ports back rather than taking full advantage of USB-C's capabilities. As I said before, I have only been able to find two USB-C hubs that offer additional USB-C ports in addition to USB-A. This means that for the time being I'm forced to connect my new USB-C equipped hard drives to my hub with USB A to C cables when my other ports are in use (and they almost always are). And that of course means carrying more cables, more adapters. What I really want is a 4 port USB-C hub!
Final Thoughts
Now that I've been using the new MacBook Pros for nearly a year, I've come to realize that the change is really not as big as I initially thought. After some trial and error, I've settled on my dongle configuration, and the extra processing power compared to my previous MacBook Pro makes the inconvenience of using dongles worth it in my mind. In many cases, the ability to adapt ports to various I/O standards actually increases the flexibility of my laptops. Though some accessories will require cumbersome dongle setups in order to work with newer hardware, it seems as though such devices are quickly becoming obsolete. Now that USB-C has been on the market for a few years, many of the initial kinks have been worked out and manufacturers are increasingly making USB-C equipped peripherals. Whereas a year ago USB-C still felt somewhat foreign to me, nowadays my older cables and devices are starting to feel a little vintage. If you've been waiting to upgrade, the time is now!